


前言
想给抽号程序更改一下验证码,之前的验证码是伪验证码,纯前端实现,这次想用php写一个真正的验证码
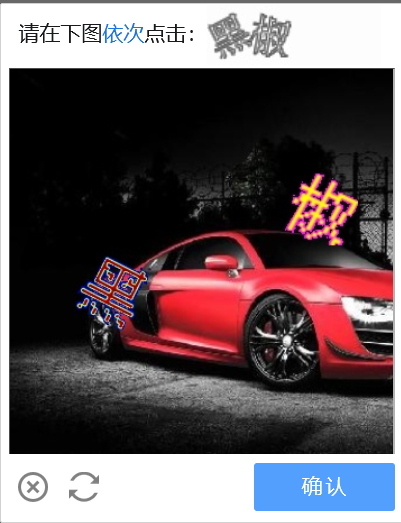
基础目标是想做一个类似于哔哩哔哩验证的功能:
基本实现思路
目录下有login.php和check_code.php,前端访问check_code.php获得图片,验证码图片(上面的那个)还有请求id(使用json,图片base64编码) login.php负责验证.
check_code.php
首先我们明显可以知道check_code.php只需要返回图片即可,所以我们可以直接指定文件头是jpeg.
<?php
header('Content-type:image/jpeg');
?>
随后,新建画布.因为我们的画布背景是一张图片,所以我们可以直接将图片作为画布.
$img = imagecreatefromjpeg("FILE_NAME");接下来就是图片的问题了.图片我找到了一个随机图床,它可以支持特定大小和格式的返回图片:
顺便说一下,php直接访问是会报403的,要模拟ua才行.完工以后,我们使用imagejpeg($img);输入图片,并记得在最后使用imagedestroy($img);释放内存.
以下是我们现在可以写出的代码(中间有三行为了调试而开了错误打印,生产环境记得关掉)(php该报500还是会报500,感觉没啥用,所以我后面删掉了这几行):
<?php
ini_set('user_agent','Mozilla/5.0 (Windows NT 10.0; Win64; x64) AppleWebKit/537.36 (KHTML, like Gecko) Chrome/107.0.0.0 Safari/537.36 Edg/107.0.1418.56');//模仿浏览器
ini_set('display_errors',1);            //错误信息
ini_set('display_startup_errors',1);    //php启动错误信息
error_reporting(-1);                    //打印出所有的 错误信息
$img = imagecreatefromjpeg("https://picsum.photos/200/200.jpg");//创建200*200大小画布

header('Content-type:image/jpeg');
imagejpeg($img);

imagedestroy($img);
?>访问check_code.php,你应该会像这样得到一张图片:

好了,接下来我们要进行添加验证码功能.为了方便验证和用户识别,我们选择三个英文字母(中文不知道为什么会乱码,加了编码header也没用...).
首先,我们新建一个字典:$str = "1234567890poiuytrewqasdfghjklmnb";为了在此中随机一个字符,可以:$fontcontent = $str[rand(0, strlen($str)-1)];.接下来,我们使用imagettftext填充字符.
以下为他的参数:
imagettftext()函数是PHP中的一个内置函数,用于使用TrueType字体将文本写入图像。
句法:
数组imagettftext(resource $image,float $size,float $angle,
int $x,int $y,int $color,string $fontfile,string $text)
参数:此函数接受上述八个参数,如下所述:$image:它指定要处理的图像。$size:它指定要使用的字体大小,以磅为单位。$angle:它以度为单位指定角度。$x:指定 x 坐标。$y:它指定 y 坐标。$color:它指定文本所需颜色的索引。$fontfile:它指定要使用的字体。$text:它指定要写入的文本。
返回值:此函数在成功时返回一个数组。
其中字体我使用的是方正像素24.
然后,我们需要用base64输出,所以首先,删除上面代码中的header('Content-type:image/jpeg');(是的,这一行就只是为了看看前面写对了没有).然后,使用ob缓冲层截取图片信息并编码.
最后,使用json编码.代码如下:
<?php
ini_set('user_agent','Mozilla/5.0 (Windows NT 10.0; Win64; x64) AppleWebKit/537.36 (KHTML, like Gecko) Chrome/107.0.0.0 Safari/537.36 Edg/107.0.1418.56');//模仿浏览器
$img = imagecreatefromjpeg("https://picsum.photos/200/200.jpg");//创建200*200大小画布

$str = "1234567890poiuytrewqasdfghjklmnb";

for($i=0;$i<3;$i++){
		$fontcolor = imagecolorallocate($img,rand(1,100),rand(1,100),rand(1,100));
		$fontcontent = $str[rand(0, strlen($str)-1)]; //设置内容是一个随机数
		//现在需要把这个随机数添加到画布上去
		$x = ($i*180/3)+rand(20,30);
		$y = rand(50,170);
		//echo $fontcontent;
      $font = "./24.TTF";
		imagettftext($img,30,rand(-30,30),$x,$y,$fontcolor,realpath($font),$fontcontent);
}

function drawBase64(){
	 global $img;
    ob_start();
    imagejpeg($img);
    $data = ob_get_contents();
    ob_end_clean();
    $base_data = "data:image/jpeg;base64,".base64_encode($data);
    imagedestroy($img);
    return $base_data;
}

$arr = array('photo_main'=>drawBase64());
echo json_encode($arr);


?>你应该会看到一串字符串,如果你想看到图片,可以在控制台使用document.write插入<img>标签查看:

接下来,就是再输出空白的只有字符的图片.思路跟上面的一样,只是要用imagecreatetruecolor(WIDTH, HEIGHT)来生成画布:(某些长代码如果不方便看可以双击代码框顶部全屏哦)
<?php
ini_set('user_agent','Mozilla/5.0 (Windows NT 10.0; Win64; x64) AppleWebKit/537.36 (KHTML, like Gecko) Chrome/107.0.0.0 Safari/537.36 Edg/107.0.1418.56');//模仿浏览器
$img = imagecreatefromjpeg("https://picsum.photos/200/200.jpg");//创建200*200大小画布
$img_short = imagecreatetruecolor(100, 30);//another image
$bgcolor = imagecolorallocate($img_short, 255, 255, 255); //为图像分配颜色
imagefill($img_short,0,0,$bgcolor); //给黑色的背景图像分配白色
$str = "1234567890poiuytrewqasdfghjklmnb";

for($i=0;$i<3;$i++){
		$fontcolor = imagecolorallocate($img,rand(1,100),rand(1,100),rand(1,100));
		$fontcontent = $str[rand(0, strlen($str)-1)]; //设置内容是一个随机数
		//现在需要把这个随机数添加到画布上去
		$x = ($i*180/3)+rand(20,30);
		$y = rand(50,170);
		//echo $fontcontent;
      $font = "./24.TTF";
		imagettftext($img,30,rand(-30,30),$x,$y,$fontcolor,realpath($font),$fontcontent);
		$fontcolor = imagecolorallocate($img,rand(1,100),rand(1,100),rand(1,100));//重新随机颜色增加攻破难度
		$x = ($i*100/3)+rand(5,10);
		$y = rand(5,10);
		imagestring($img_short,5,$x,$y,$fontcontent,$fontcolor);
}

function drawBase64($img){
	 $img;
    ob_start();
    imagejpeg($img);
    $data = ob_get_contents();
    ob_end_clean();
    $base_data = "data:image/jpeg;base64,".base64_encode($data);
    imagedestroy($img);
    return $base_data;
}

$arr = array('photo_main'=>drawBase64($img), 'photo_short'=>drawBase64($img_short));
echo json_encode($arr);


?>如果你这样做了,你应该可以看见类似于下面的两张图片(直接返回的是转义的json字符串,你要自己去格式化去转义然后再用<img>套上才能验证程序是否正确.)


接下来就是存储信息至数据库备验.
以下我省略了数据库连接,使用photo_verification表存储数据,有code和id字段.
首先我们设置数组positionX和positionY来存储坐标,然后将其写入一个总的数组,最后使用json_encode编码即可.最后存入数据库.这里我是采用循环随机id直到id未被使用为止.
代码如下:
<?php

ini_set('display_errors',1);            //错误信息
ini_set('display_startup_errors',1);    //php启动错误信息
error_reporting(-1);                    //打印出所有的 错误信息

$servername = "127.0.0.1";
$username = "endermite";
$password = "JavaScript_515114";
$dbname = "random";

$conn = new mysqli($servername, $username, $password, $dbname);
if ($conn->connect_error) {
    die("连接失败: " . $conn->connect_error);
}

ini_set('user_agent','Mozilla/5.0 (Windows NT 10.0; Win64; x64) AppleWebKit/537.36 (KHTML, like Gecko) Chrome/107.0.0.0 Safari/537.36 Edg/107.0.1418.56');//模仿浏览器
$img = imagecreatefromjpeg("https://picsum.photos/200/200.jpg");//创建200*200大小画布
$img_short = imagecreatetruecolor(100, 30);//another image
$bgcolor = imagecolorallocate($img_short, 255, 255, 255); //为图像分配颜色
imagefill($img_short,0,0,$bgcolor); //给黑色的背景图像分配白色
$str = "1234567890poiuytrewqasdfghjklmnb";
$positionX = array();
$positionY = array();
$x_cache = array();
$x_cache[0] = 0;
$x_cache[1] = 1;
$x_cache[2] = 2;
shuffle($x_cache);
for($i=0;$i<3;$i++){
	global $postionX, $postionY;
	$fontcolor = imagecolorallocate($img,rand(1,100),rand(1,100),rand(1,100));
	$fontcontent = $str[rand(0, strlen($str)-1)]; //设置内容是一个随机数
	//现在需要把这个随机数添加到画布上去
	$x = ($x_cache[$i]*180/3)+rand(20,30);
	$y = rand(50,170);
	$positionX[$i] = $x;
	$positionY[$i] = $y;
	//echo $fontcontent;
    $font = "./24.TTF";
	imagettftext($img,30,rand(-30,30),$x,$y,$fontcolor,realpath($font),$fontcontent);
	$fontcolor = imagecolorallocate($img,rand(1,100),rand(1,100),rand(1,100));//重新随机颜色增加攻破难度
	$x = ($i*100/3)+rand(5,10);
	$y = rand(5,10);
	imagestring($img_short,5,$x,$y,$fontcontent,$fontcolor);
}

function drawBase64($img){
	$img;
    ob_start();
    imagejpeg($img);
    $data = ob_get_contents();
    ob_end_clean();
    $base_data = "data:image/jpeg;base64,".base64_encode($data);
    imagedestroy($img);
    return $base_data;
}

$arr = array('photo_main'=>drawBase64($img), 'photo_short'=>drawBase64($img_short));
//echo json_encode($arr);

$str = json_encode(array('x1'=>$positionX[0], 'x2'=>$positionX[1], 'x3'=>$positionX[2], 'y1'=>$positionY[0], 'y2'=>$positionY[1], 'y3'=>$positionY[2]));
$id = rand(1, 99999999);
$id_check = "SELECT id FROM photo_verification where id='".$id."';";
$result=mysqli_query($conn,$id_check);
$row=mysqli_num_rows($result);

while($row!=0){
	$id = rand(1, 99999999);
	$id_check = "SELECT id FROM photo_verification where id='".$id."';";
	$result=mysqli_query($conn,$id_check);
	$row=mysqli_num_rows($result);
}
$sql = "INSERT INTO photo_verification (id,code)
VALUES ('".$id."','".$str."')";
if ($conn->query($sql) === TRUE) {
	$arr['id'] = $id;
	echo json_encode($arr);
} else {
	echo "Error: " . $sql . "<br>" . $conn->error;
}

?>到现在,check_code.php就完成了.接下来我们进入login.php.这里我认为只需在原来的login.php中加入验证验证码.对于登陆以后的验证功能,我准备首先在登陆时如果成功就传回账号和密码的密文,然后前端后面就使用密文就可以在无验证的情况下正常使用(即自动登录和上传数据使用).
我们使用$decodeSuccess来验证前端传输的是密文还是明文.这个可以通过openssl_decrypt不成功会返回FALSE来实现:
if($decodeSuccess == FALSE) {
    $user = XXX/*解密username*/;
    $pass = XXX/*解密password*/;
    $code = json_decode($_POST['code'], true);
    $check_id = addslashes($_POST['id']);
    $id_check = "/*查询id是否存在*/";
    $result=mysqli_query($conn,$id_check);
    $row=mysqli_num_rows($result);
    if($row != 1) {
        die("no such id");
    }
	if($code == NULL) {
		die("Fail to decode json");
	}
	$id_check = "/*获取数据库中数据*/";
	$result = mysqli_fetch_assoc(mysqli_query($conn,$id_check));
	$code_sql = json_decode(json_encode($result), true);
	$code_sql = $code_sql['code'];
	$code_sql = json_decode($code_sql, true);
	if(/*判断x,y值.这个需要根据你自己check_code中角度等设置自己确定偏移量*/) {
          //我在这里没有代码,根据需要添加
	} else {
        die("verification error");
    }

} else {
	$user = addslashes($_POST['username']);
    $pass = addslashes($_POST['password']);
}
//接下来就是常规的数据库操作了
最后,我们来到前端实现.这个因具体需要而异,所以我就直接贴上我的代码.
<style>
.check_code{
  left: 50%;
  top: 50%;
  position: fixed;
  transform: translate(-50%, -50%);
  width: 300px;
  height: 350px;
  background: white;
  z-index: 10000;
  /*box-shadow: 0px 0px 3px 3px #eae9e9;*/
  border-radius: 5px;
}
.check_code_content{
  position: relative;
  height: 30px;
  width: 85%;
  top: 20px;
  left: 50%;
  transform: translate(-50%);
}
.check_code_tip{
  position: relative;
  height: 30px;
  width: 100px;
  /*background-image: black;*/
  display: inline-block;
}
.check_code_image{
  position: relative;
  height: 200px;
  width: 200px;
  left: 50%;
  transform: translate(-50%);
  /*display: inline-block;*/
  top: 40px;
}
.check_code_restart{
  position: absolute;
  height: 20px;
  width: 20px;
  left: 20px;
  top: 310px;
  display: block;
}
.check_code_restart:hover{
  fill:#dd5353;
}
.check_code_cancel{
  position: absolute;
  height: 25px;
  width: 25;
  left: 50px;
  top: 307.5px;
  display: block;
}
.check_code_cancel:hover{
  fill:#dd5353;
}
.check_code_submit {
  position: absolute;
  height: 30px;
  width: 70px;
  background-color: #088ef0;
  top: 305px;
  left: 220px;
  border-radius: 5px;
  text-align: center;
  border-color: #088ef0;
}
.check_mode_click {
  position: fixed;
  z-index: 10000;
  width: 15px;
}
body.dark-mode .check_code {
  background-color: #31363b !important;
}
body.dark-mode .check_code svg{
  fill: #eee;
}
body.dark-mode .check_code_cancel:hover{
  fill:#e67474;
}
body.dark-mode .check_code_restart:hover{
  fill:#e67474;
}
</style>

<script>
//可能会有些变量我在这个blog代码块忘了声明,因为我实际是放在其他地方的,你自己声明就可以了,无默认值
var check_mode_click_position = new Array();
function handleClick(event){
  event = event || window.event;
  //console.log(event.clientX, event.clientY);
  let _x = event.clientX-8;
  let _y = event.clientY-20;//纠正图片和鼠标相对位置差
  let _x_relative = _x - ((document.body.clientWidth - 200) / 2 - 9);
  let _y_relative = _y - ((document.body.clientHeight - 200) / 2 - 24.5);//获取鼠标位置在图片上的相对位置
  //这些数据都是我实验出来的,你自己根据实际情况做修改.
  console.log(_x_relative, _y_relative);//调试代码
  let _ui_click = document.createElement("img");
  _ui_click.setAttribute('class','check_mode_click');
  _ui_click.setAttribute('src','/*这里填入你的鼠标点击的反馈图标(就是那个像图钉的东西)链接.*/');
  check_mode_click_position.push(_x_relative);
  check_mode_click_position.push(_y_relative);
  _ui_click.setAttribute('style', `top:${_y}px;left:${_x}px;`);//我使用的fixed,你可以改进.
  document.body.appendChild(_ui_click);
}
function check_code(){
  check_mode_click_position.length = 0;
  var loadingid_con = $(document.body).NZ_Loading('show', { content: "正在获取验证码图片,请稍后..." });//我使用的nz-loading插件表示加载中,因为那个随机图床访问有些慢
  let timesetoutid = setTimeout(function () {
    $(document.body).NZ_Loading("hide", { loadingid: loadingid_con });
	  login_alert("error",'连接超时,请<font color="red">刷新后</font>重试.');
  }, 10000);//login_alert是用的sweet alert,你自己修改.
  $.post(`${main_host}/api/random/check_code.php`,
    {
      //我没有发送数据,你可以自己在check_code里添加
    },
    function(result){
      $(document.body).NZ_Loading("hide", { loadingid: loadingid_con });
		  clearTimeout(timesetoutid);
      result = result.replace(new RegExp("\\\\\"","gm"),"\"");
      photo_json = JSON.parse(result);
      console.log(photo_json);//调试代码
      let web_ui = `
      <div class="check_code_content">请<font color="#3daee9">依次</font>点击以下字符:<img class="check_code_tip" src="${photo_json.photo_short}"></img></div>
      <img class="check_code_image" id="check_code_image" src="${photo_json.photo_main}" onclick="handleClick(event)"></img>
      <svg xmlns="http://www.w3.org/2000/svg" onclick="check_code_restart()" width="20px" height="20px" class="check_code_restart" vntiewBox="0 0 24 24"><!--/*重新开始的svg*/--></svg>
      <svg clip-rule="evenodd" fill-rule="evenodd" class="check_code_cancel" onclick="check_code_cancel();" stroke-linejoin="round" stroke-miterlimit="2" viewBox="0 0 24 24" xmlns="http://www.w3.org/2000/svg"><!--/*取消的svg*/--></svg>
      <button class="check_code_submit" onclick="user_login()">确认</button><!--//这个东西后面的不用我贴上来了吧-->
      `;
      let _ui_div = document.createElement("div");
      _ui_div.setAttribute('class','check_code');
      _ui_div.innerHTML = web_ui;
      document.body.appendChild(_ui_div);
    }
  )
}
let check_code_cancel = () => {
  let delete_cache = document.getElementsByClassName("check_code");
  delete_cache[0].remove();
  delete_cache = document.getElementsByClassName("check_mode_click");
  while(delete_cache.length != 0) {
    delete_cache[0].remove();
  }
}
let check_code_restart = () => {
  check_code_cancel();
  check_code();
}

function login_alert(type,mag) {
	swal({
        title: type.toLocaleUpperCase(),
        text: mag,
        icon: type,
        button: "我知道了"
      })
}
</script>
接下来,就是见证奇迹的一刻:
以上.

Comments | NOTHING